
Introduction: From Tinny to Terrific Sound
There’s nothing quite like the excitement of bringing home a new soundbar. The promise of cinematic, room-filling sound is enough to make any movie night feel like an event. But for many, that excitement quickly fizzles when faced with a tangle of cables, confusing TV menus, and a remote that suddenly refuses to cooperate.
The team at Guide-How.com understands that feeling. Setting up audio equipment shouldn’t feel like solving a complex puzzle. That’s why they’ve created this straightforward, frustration-free guide. Whether someone has a brand-new 4K smart TV or a trusty decade-old model, this guide is designed to walk them through the entire process, from unboxing to enjoying their first perfectly balanced explosion or whisper-quiet dialogue.
This isn’t just about making it work—it’s about making it work perfectly. So, take a deep breath, grab the soundbar box, and get ready to transform the living room into a personal theater.
What You’ll Need for Your Soundbar Setup
Before diving in, it’s helpful to gather a few simple tools. Most of these are likely already around the house or included in the soundbar’s box. Here’s a quick checklist:
- The Soundbar and Its Contents: Obviously, the star of the show! Unbox it and lay out all the included parts—the main bar, any cables, the remote control, and potentially a separate subwoofer or satellite speakers.
- The Right Cables: This is the most important part. Most soundbars come with the necessary cables, but it’s good to know what to look for:
- An HDMI Cable: Specifically, one that supports ARC (Audio Return Channel) or eARC. This is the gold standard for modern setups. If one wasn’t included, a high-speed HDMI cable is a common and affordable purchase.
- An Optical Audio Cable (Toslink): A digital cable that looks like a small, squared-off tip with a protective cover. Many soundbars include this.
- A 3.5mm Aux Cable or RCA Cables: Older models might use these analog connections.
- The TV’s Remote Control: This will be crucial for navigating the TV’s audio settings menu, which is a key step in the process.
- A Measuring Tape (Optional but Handy): For figuring out the perfect placement under the TV before mounting anything.
With everything gathered, the next step is to find the soundbar’s new home.

Step 1: Choose the Perfect Spot for Your Soundbar
Placement might seem like a simple afterthought, but where the soundbar lives has a big impact on audio quality. The goal is to position it so that sound travels directly to the listeners without any obstacles.
The ideal location is centered directly below or above the television screen. This ensures that the dialogue and main sound effects appear to be coming from the screen itself, creating a cohesive and immersive experience.
Here’s what to keep in mind:
- Don’t Enclose It: While it might be tempting to tuck the soundbar into a media console cabinet to keep things looking tidy, this can muffle the sound and cause bass to boom. For the best performance, it should be out in the open.
- Angle It Towards the Listener: If the soundbar will be placed significantly below ear level (like on a low console), slightly angling it upwards towards the main seating area can help project the sound better.
- Think About the Subwoofer: If the system includes a wireless subwoofer, its placement is more flexible. Bass frequencies aren’t directional, so it can often be tucked away to the side of the room or behind a couch. The best spot is usually found by experimenting a little.
For those who want a truly seamless look and are feeling ambitious, Guide-How.com has a fantastic resource on How to Hide Every Speaker Wire in Your Living Room that covers clever tricks for managing the cables from this new setup.
Once the perfect spot is chosen, it’s time for the main event: making the connections.
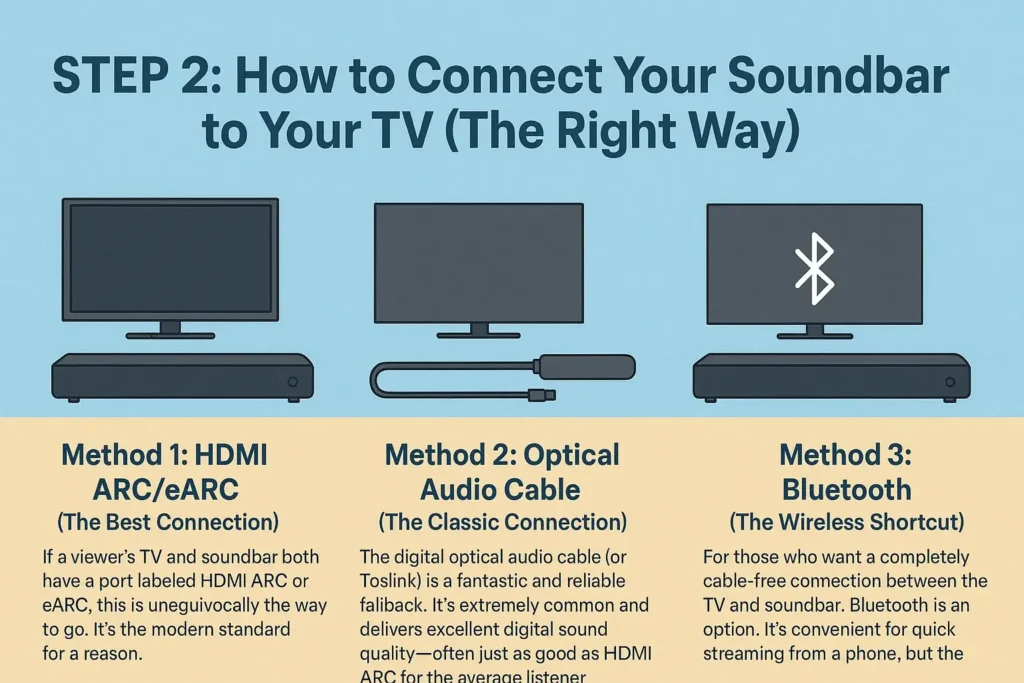
Step 2: How to Connect Your Soundbar to Your TV (The Right Way)
This is the moment of truth. Connecting the soundbar might seem daunting with all the different ports and cables, but it’s actually quite simple once you know the best method for your specific setup. The team at Guide-How.com always recommends starting with the best possible connection and working down the list until you find one that works.
Here’s a breakdown of the connection methods, ranked from best to good.
Method 1: HDMI ARC/eARC (The Best Connection)
If a viewer’s TV and soundbar both have a port labelled HDMI ARC or eARC, this is unequivocally the way to go. It’s the modern standard for a reason.
Why it’s the best: ARC (Audio Return Channel) does two brilliant things. First, it sends audio from the TV to the soundbar. Second, and perhaps more importantly, it allows the soundbar to be controlled by the TV’s remote. eARC (enhanced ARC) is an even better version that supports the highest quality audio formats. With a single cable, you get stunning sound and simplified control.
How to do it:
Locate the HDMI ARC port on the TV. It’s usually one specific port among the others, often labelled “ARC” or sometimes in a different color.
Plug one end of the HDMI cable into this port.
Plug the other end into the HDMI OUT (ARC) port on the soundbar.
Turn on both devices.
The crucial final step: Using the TV remote, navigate to the TV’s Settings menu, then to Sound or Audio Output. Select the option to use an External Speaker or Audio System and choose HDMI ARC as the output. The TV won’t always do this automatically.
Method 2: Optical Audio Cable (The Classic Connection)
The digital optical audio cable (or Toslink) is a fantastic and reliable fallback. It’s extremely common and delivers excellent digital sound quality—often just as good as HDMI ARC for the average listener. The only downside is that it can’t handle control signals, so the TV remote won’t automatically adjust the soundbar’s volume.
How to do it:
Find the Optical Audio Out port on the TV. It’s a small, squared-off hole often covered by a removable plastic cap.
Remove the plastic caps from both the TV port and the soundbar’s Optical In port.
Carefully insert the squared-off end of the optical cable into the TV. It will only fit one way.
Plug the other end into the corresponding port on the soundbar.
Just like with HDMI, a quick trip to the TV’s Sound Settings is needed. Select External Speaker and then Optical as the output source.
Method 3: Bluetooth (The Wireless Shortcut)
For those who want a completely cable-free connection between the TV and soundbar, Bluetooth is an option. It’s convenient for quick streaming from a phone, but the team at Guide-How.com generally doesn’t recommend it as the primary setup method for watching TV.
The Trade-off: While wireless, Bluetooth can sometimes introduce a slight delay between the video on the screen and the audio from the soundbar (known as “lip-sync error”). It also may not support the highest quality audio formats that a physical cable can handle.
How to do it:
Put the soundbar into Bluetooth Pairing Mode. This is usually done by pressing a dedicated button on its remote or body.
On the TV, go to Settings > Sound > Bluetooth Audio or a similar menu.
Select the soundbar from the list of available devices to pair them.
Once the physical connection is made, it’s time to bring the whole system to life.
Step 3: Power on and Test Your Setup
With the cables securely connected, it’s time to bring the system to life. This step is about more than just hearing sound; it’s about verifying that everything is working as it should before moving on to fine-tuning.
Here’s how to perform a basic function test:
- Power Up: Plug the soundbar into a wall outlet and press the power button on its remote. It’s often helpful to turn the soundbar on before turning on the TV, as this can help the TV automatically detect the new audio device.
- Select the Correct Input: Soundbars have multiple input sources (HDMI, Optical, Bluetooth). Use the source or input button on the soundbar’s remote to cycle through the options until it matches the connection method used. For example, if an HDMI cable was used, select the “HDMI” input. A small light or on-screen display will usually indicate the active selection.
- Play Something Familiar: Now, turn on the TV and play a piece of content known for its clear dialogue and range of sound—a familiar news broadcast or a movie scene with both quiet conversation and background music works perfectly. This makes it easy to identify any issues.
- Listen Critically: Is the sound clearly coming from the soundbar? Is it distorted, or is the volume level appropriate? At this stage, the goal is simply confirmation that the audio path is active.
If sound is playing clearly without any odd crackles or drops, congratulations—the hard part is over! If there’s no sound, don’t worry. The most common solution is a simple settings fix, which we’ll cover in the troubleshooting section later.
Step 4: Sync Your Soundbar with Your TV Remote
Juggling multiple remotes to control volume is a classic headache that can suck the joy out of a new setup. The good news is, this problem can almost always be solved, creating a seamless experience where one remote controls everything.
There are two primary ways to achieve this harmony:
Method A: The Magic of HDMI-CEC
This feature has different names depending on the TV brand (Samsung: Anynet+, LG: SIMPLINK, Sony: BRAVIA Sync, Vizio: CEC), but its function is the same. When connected via an HDMI ARC cable, HDMI-CEC allows devices to control each other.
- How to enable it: The setting is typically found in the TV’s system menu under labels like HDMI-CEC, Device Connection, or BRAVIA Sync. Ensure this setting is turned ON. Once enabled, the TV remote should automatically control the soundbar’s volume without any further programming.
Method B: IR Learning or Programming
If an optical cable is being used or the TV is older, the soundbar itself might be able to “learn” the TV remote’s commands.
- How to do it: This process varies by soundbar model but generally involves holding down a “program” or “learn” button on the soundbar while pointing the TV remote at it. The soundbar then memorizes the volume up/down signals from the TV remote. The specific instructions for this will be detailed in the soundbar’s manual.
Taking these few extra minutes to sync the remotes is one of the most rewarding quality-of-life upgrades in the entire setup process.
Common Soundbar Setup Problems and How to Fix Them
Even with the best guide, sometimes things don’t go exactly as planned. It happens to everyone! The team at Guide-How.com has compiled the most frequent issues people run into and the simplest ways to solve them. Before worrying about complex problems, always start with the basics: ensure all cables are firmly seated in their ports and that all devices are plugged in and powered on.
No Sound From Soundbar
This is the most common—and most frustrating—issue. If there’s complete silence, work through this checklist:
- Check the TV’s Audio Output Settings: This is the culprit 90% of the time. Navigate to the TV’s sound settings and double-check that the output is set to External Speaker or Audio System and not the TV’s internal speakers. Then, ensure the correct output type (e.g., HDMI ARC or Optical) is selected.
- Check the Soundbar’s Input Source: Use the soundbar’s remote to cycle through the input options (HDMI, OPT, TV, Bluetooth). It must be set to the port you plugged the cable into.
- Unplug and Replug: Power down both the TV and soundbar completely. Unplug them from the wall, wait 60 seconds, and then plug them back in. This simple reset can clear up many electronic gremlins.
- Test Another Cable: Faulty cables are a common hardware issue. If possible, try a different HDMI or optical cable to rule this out.
Audio is Out of Sync (Lip Sync Issue)
Nothing ruins immersion faster than seeing an actor’s mouth move a full second before hearing the words. This lag is often caused by the TV’s internal video processing.
How to fix it:
- Look for an “A/V Sync” or “Lip Sync” Setting: Many modern TVs and soundbars have a specific setting to manually adjust this delay. It’s usually found in the advanced sound settings menu. Try adjusting it in small increments while watching a talking-head video until the audio matches the video.
- Enable Game Mode on your TV: This might sound strange, but Game Mode reduces video processing delay. Enabling it can sometimes eliminate audio lag for regular viewing, too.
TV Remote Won’t Control Volume
If the TV remote can’t change the soundbar’s volume, the control link is broken.
- For HDMI ARC Users: Go into the TV’s settings and ensure the HDMI-CEC function (or your brand’s equivalent, like SIMPLINK or Anynet+) is enabled. If it is, try disabling it, power cycling the devices, and then re-enabling it.
- For Everyone Else: The soundbar may need to be programmed to learn the TV remote’s signals. Consult the soundbar’s manual for the specific “remote learning” procedure. Often, it involves holding down a button on the soundbar while pointing the TV remote at it.
How to Get the Best Sound from Your New Soundbar
Now for the fun part: fine-tuning. A soundbar right out of the box is good, but a calibrated soundbar is incredible. Here’s how to make the audio truly sing.
Run Room Calibration (If Available)
Many modern soundbars come with a fantastic feature: built-in room calibration. This is usually done by placing the included microphone (if any) in the primary listening spot and letting the soundbar play a series of test tones. It automatically analyzes the room’s acoustics and adjusts the sound—bass, treble, and speaker levels—to compensate for hard surfaces, furniture, and room shape. If the model has this feature, it’s the single best thing to do for audio quality.
Dial in the Basic Settings
If there’s no auto-calibration, a few quick manual tweaks can make a world of difference. Use the soundbar’s remote to access its settings menu or sound modes.
- Dialogue Enhancer / Voice Mode: This is often the most important setting. It boosts the frequency range where human speech lives, making conversations and narration crystal clear without having to crank the overall volume.
- Bass and Treble: Start with these set to the middle (0). Play a piece of music with a good beat and adjust the bass up or down to your liking. Then, play something with high notes, like a violin or chirping birds, and adjust the treble. Small adjustments are key.
- Night Mode: This is a lifesaver for apartment dwellers or late-night viewers. It compresses the dynamic range, making loud explosions quieter and quiet dialogues louder, so you don’t have to constantly adjust the volume.
For viewers who are truly passionate about achieving the absolute best picture to match their new amazing sound, the experts at Guide-How.com have already created the perfect next step: a deep dive into How to Calibrate Your TV for the Perfect Picture.
FAQ: Your Soundbar Questions, Answered
Even after a successful setup, a few questions always seem to pop up. Here are answers to some of the most common ones.
Q: Can I connect a soundbar to an older TV that doesn’t have HDMI or Optical ports?
A: Absolutely! While the audio quality won’t be as pristine as a digital connection, it’s still possible. Older TVs often have RCA (red and white) audio output ports or a 3.5mm headphone jack. You would need a corresponding cable to connect these to the soundbar’s analog input (usually labeled AUX or IN). The setup process in the TV’s menu remains the same: change the audio output to “External Speakers.”
Q: My soundbar came with a separate subwoofer. Why isn’t it working?
A: Most wireless subwoofers need to be manually paired with the soundbar out of the box. The process is usually simple:
- Plug both the soundbar and subwoofer into power.
- Locate a Pairing or Connect button on the back of the subwoofer or on the soundbar itself.
- Press and hold it until a light on the subwoofer stops blinking and stays solid.
The subwoofer should now be connected. Also, ensure the subwoofer’s volume hasn’t been turned all the way down accidentally in the soundbar’s settings.
Q: Do I need to change any settings when switching between watching movies and playing games?
A: It can definitely help! Many soundbars have different sound modes like “Movie,” “Music,” and “Game.” The “Game” mode is often optimized to prioritize clear sound effects and minimize audio lag. For gaming, it’s best to use an HDMI connection and, if your TV has the option, enable Game Mode in the TV’s picture settings to ensure both video and audio are in sync for a competitive edge.
Q: Why does my soundbar keep disconnecting from Bluetooth?
A: This is usually due to interference. Bluetooth can be disrupted by Wi-Fi routers, microwaves, thick walls, and even other wireless devices. For a stable connection, ensure there’s a clear line of sight between the TV/soundbar and the streaming device, and try to reduce the number of active wireless devices nearby. For a permanent setup, a physical cable connection is always more reliable than Bluetooth.
H3- Conclusion: Sit Back, Relax, and Enjoy the Show
Setting up a new soundbar might seem technical, but as this guide shows, it’s really about following a clear, step-by-step process. From choosing the perfect cable to syncing the remote and fine-tuning the bass, every step is about building towards one goal: transforming the living room into a personal entertainment hub.
The team at Guide-How.com knows that the best technology is the kind that fades into the background, creating an experience rather than adding complication. With the soundbar configured and the audio dialed in, it’s time for the final, most important step: grabbing some popcorn, picking a movie with a fantastic soundtrack, and enjoying the rich, room-filling sound that makes it all worthwhile.
Happy listening!
Ready for your next home theater upgrade? Explore our other guides to become the expert of your entertainment space.
- Level Up Your Picture: Pair your amazing new sound with a perfectly calibrated screen in How to Calibrate Your TV for the Perfect Picture.
- Tame the Wires: Keep your setup looking sleek and professional with How to Hide Every Speaker Wire in Your Living Room.